Yep that was me but then I graduated two more strings as my playing has gotten alot more better. How did you hear about me and my little band?
dude, I jammed with you a few times, your guitarist use to work at that music store in manassas, and I would talk to him once in a while.
Bringing an ORIGINAL 1964 Fender Mustang back to life
-
oipunkguy

- Master Contributor
- Posts: 2208
- Joined: Tue Jul 22, 2008 1:05 am
- Location: Winchester, Virginia
- Contact:
Re: Bringing an ORIGINAL 1964 Fender Mustang back to life
Cheers,
Aaron
Facebook.com/aarons.guitars
"Politicians are like diapers; they need to be changed often and for the same reason."
— Mark Twain
Aaron
Facebook.com/aarons.guitars
"Politicians are like diapers; they need to be changed often and for the same reason."
— Mark Twain
-
KRamone27

- Master Contributor
- Posts: 1325
- Joined: Mon May 05, 2008 1:38 pm
- Location: Carterville, IL
- Contact:
Re: Bringing an ORIGINAL 1964 Fender Mustang back to life
Yeah, I'm the guy that worked at Music Outlet in Manassas
-
ElTwang
- Top Producer
- Posts: 617
- Joined: Mon Jun 16, 2008 11:51 am
- Location: Copenhagen, Denmark
Re: Bringing an ORIGINAL 1964 Fender Mustang back to life
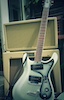
Here's a pic of my '65 Mustang that has been refinished at some point in it's life. It sounds really cool! And it seems to be a transition model as it has '64 parts on it. The neck dates '65 Feb size A.

-
oipunkguy
- Master Contributor
- Posts: 2208
- Joined: Tue Jul 22, 2008 1:05 am
- Location: Winchester, Virginia
- Contact:
Re: Bringing an ORIGINAL 1964 Fender Mustang back to life
cool pics guys, and thanks for all the replies.
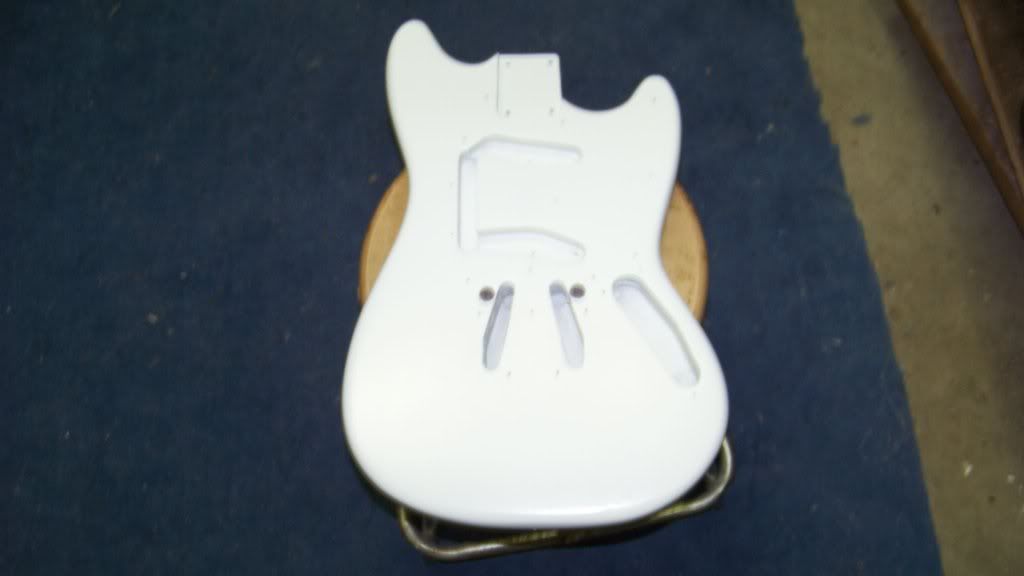
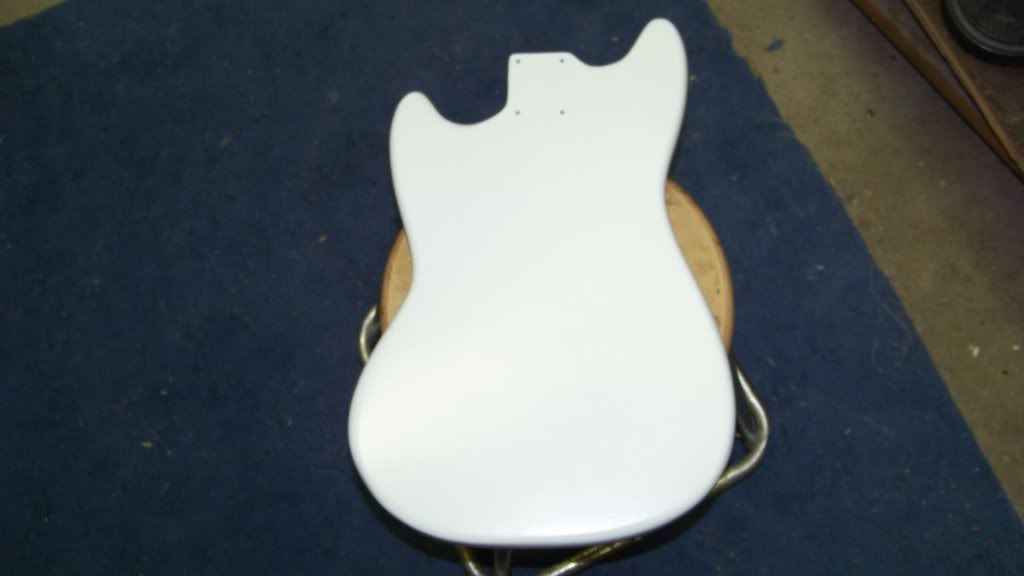
one thing about this mustang that i was working on is, again, I had none of the original parts, so I had to buy new ones. The customer and I both decided to paint this guitar olympic white, however the original mustangs were never clear coated in olympic white. this prevented the white color to turn cream over time, however without a clear coat, on many white mustangs, the color coat would get ruffed up a bit easily. and to me, looks like the guitar is just dirty. for this reason I decided to clear coat this mustang.
one other note. I also decided to clear coat over the logo (like the reissue mustangs) opposed to applying the it on top of the clear coat like the originals, since the logos are too easily removed without a protective top coat.
Cheers,
Aaron
Facebook.com/aarons.guitars
"Politicians are like diapers; they need to be changed often and for the same reason."
— Mark Twain
Aaron
Facebook.com/aarons.guitars
"Politicians are like diapers; they need to be changed often and for the same reason."
— Mark Twain
-
oipunkguy
- Master Contributor
- Posts: 2208
- Joined: Tue Jul 22, 2008 1:05 am
- Location: Winchester, Virginia
- Contact:
Re: Bringing an ORIGINAL 1964 Fender Mustang back to life
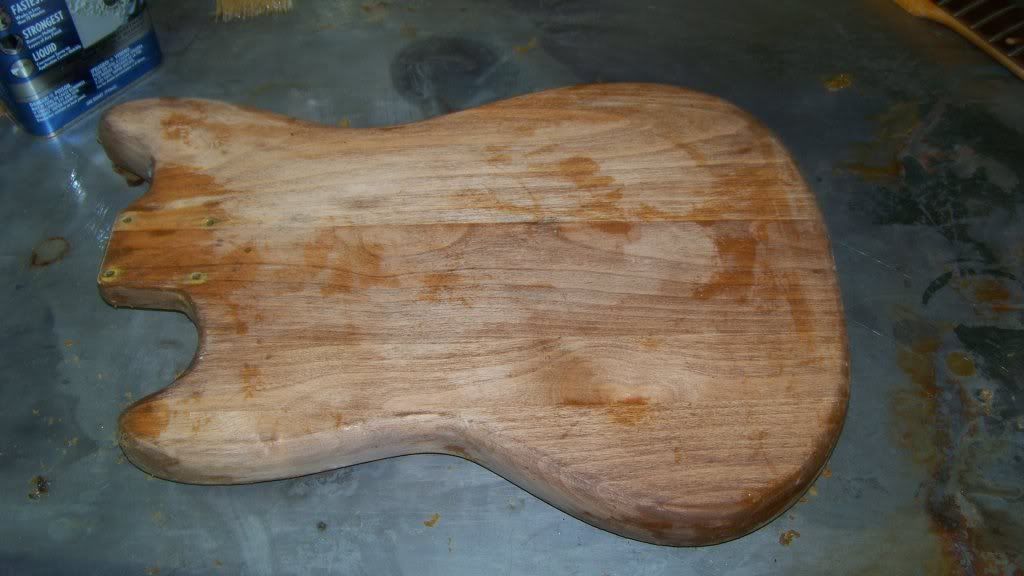
so where were we? ahh yes. well my next step, after cleaning up any extra leftover stripper residue and varnish, was to sand this puppy. once I got it to where I was happy with it, I applied a natural grain filler. I used bartley's paste grain filler. I like this stuff far more then
the water based filler that stew mac sells. I got mine through guitar reranch.
I liberally applied the filler with a small sponge brush across the grain of the guitar body, let it set for a few minutes, then wiped off the excess with a plastic scrapper followed by paper towels. Once that was done, I allowed it to completely dry over night, and then reapplied the filler again after a quick sanding and clean up. I applied filler twice to both front and back and to the sides of the guitar, but not the neck pocket.
**note: for anyone that wants to try refinishing a guitar, and has never done it before. take my advice. remove ALL the excess filler on the guitar before you allow it to dry. sanding off clumps of dried filler is a giant pain and the you know what. especially on soft wood like popular! if the filler starts to dry on you before you get it all off, you may remove the excess with mineral spirits or naphtha**
Once I got the guitar body to where I was happy, then I began spraying the sealer coat. the sealer coat does not have to be nitro lacquer, but I prefer nitro. also the sealer coat dries quickly, and can by sprayed and sanded several times a day to get the guitar to a desired smoothness. always try to get the guitar body as smooth as possible before moving on. it will save you much sanding and spraying time later on in the process.
cheers all
Aaron
Cheers,
Aaron
Facebook.com/aarons.guitars
"Politicians are like diapers; they need to be changed often and for the same reason."
— Mark Twain
Aaron
Facebook.com/aarons.guitars
"Politicians are like diapers; they need to be changed often and for the same reason."
— Mark Twain
-
oipunkguy
- Master Contributor
- Posts: 2208
- Joined: Tue Jul 22, 2008 1:05 am
- Location: Winchester, Virginia
- Contact:
Re: Bringing an ORIGINAL 1964 Fender Mustang back to life
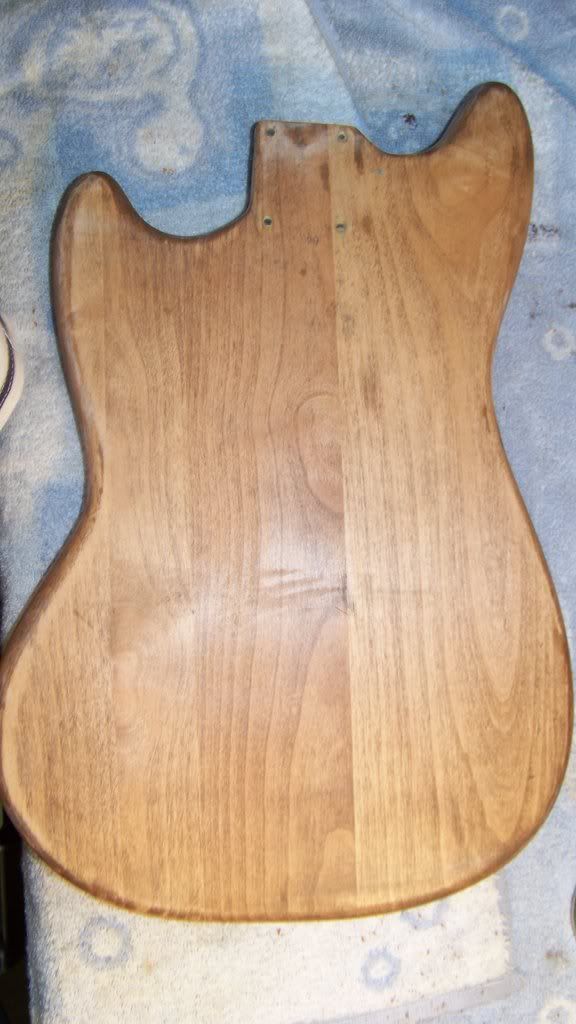
after final stripping:
after first coat of filler: notice I had yet to remove the brass shielding
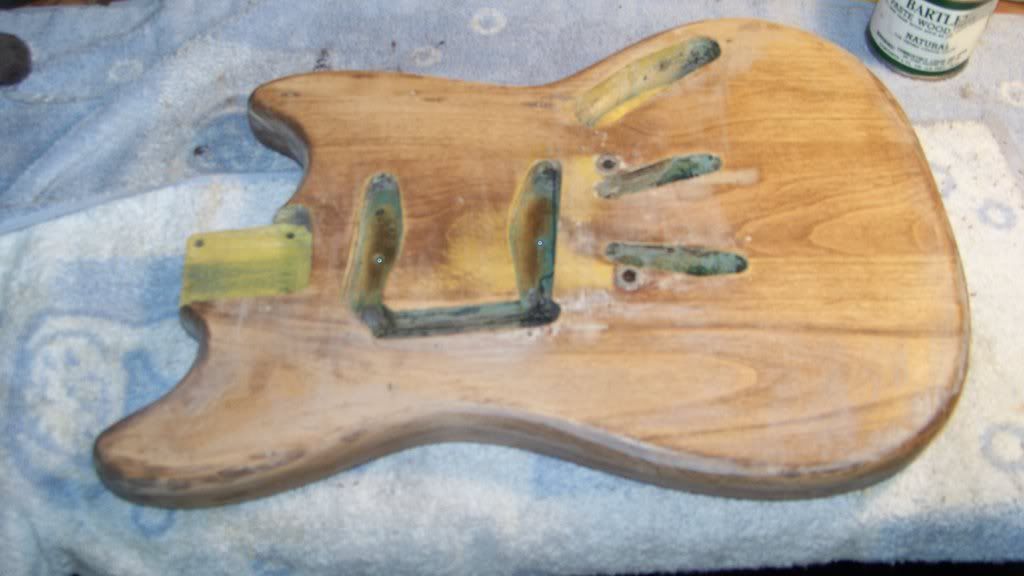
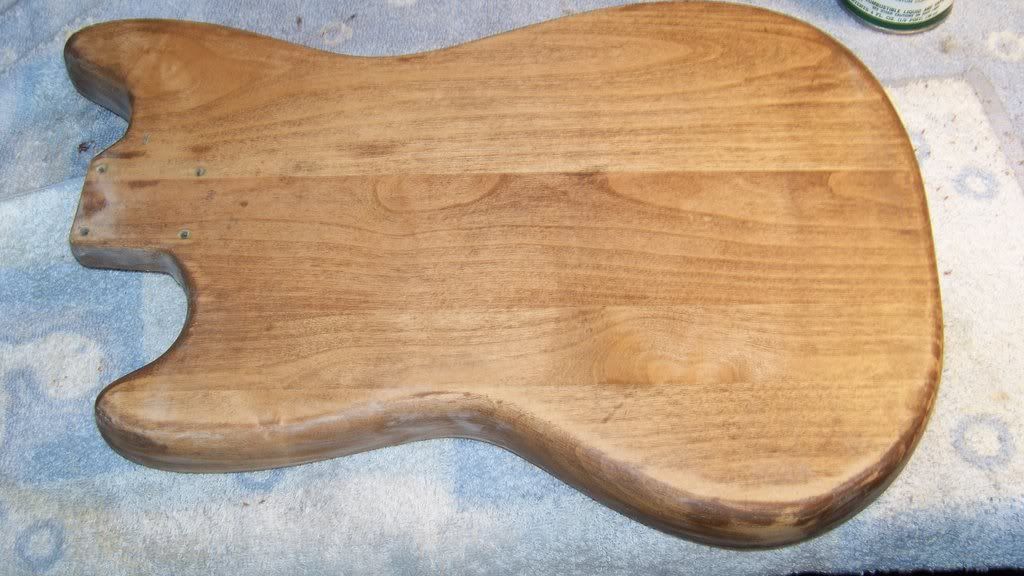
after the second coat of filler:
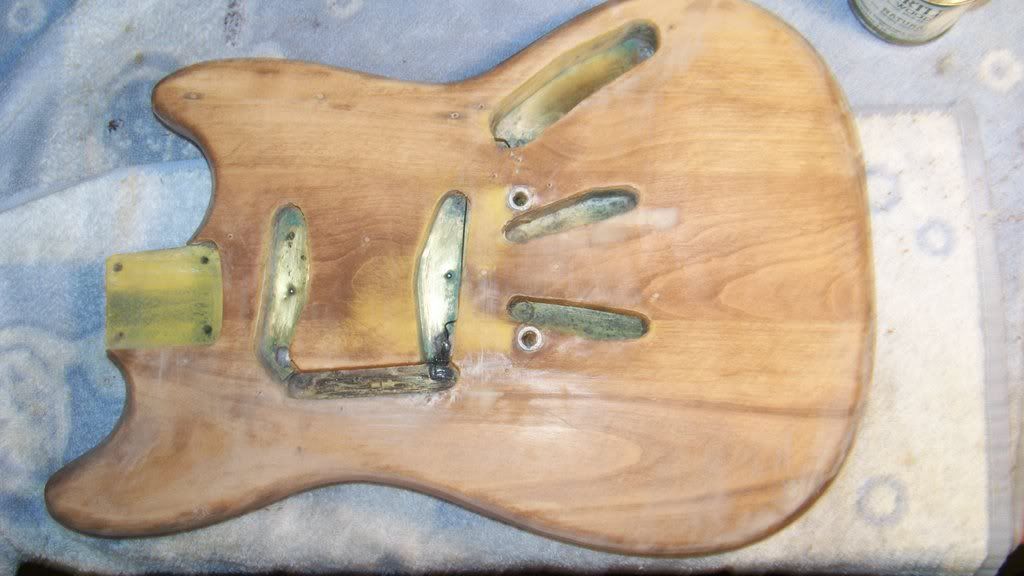
after the second coat of filler, and the first coats of sanding sealer:
after first coat of filler: notice I had yet to remove the brass shielding
after the second coat of filler:
after the second coat of filler, and the first coats of sanding sealer:
Cheers,
Aaron
Facebook.com/aarons.guitars
"Politicians are like diapers; they need to be changed often and for the same reason."
— Mark Twain
Aaron
Facebook.com/aarons.guitars
"Politicians are like diapers; they need to be changed often and for the same reason."
— Mark Twain
-
oipunkguy
- Master Contributor
- Posts: 2208
- Joined: Tue Jul 22, 2008 1:05 am
- Location: Winchester, Virginia
- Contact:
Re: Bringing an ORIGINAL 1964 Fender Mustang back to life
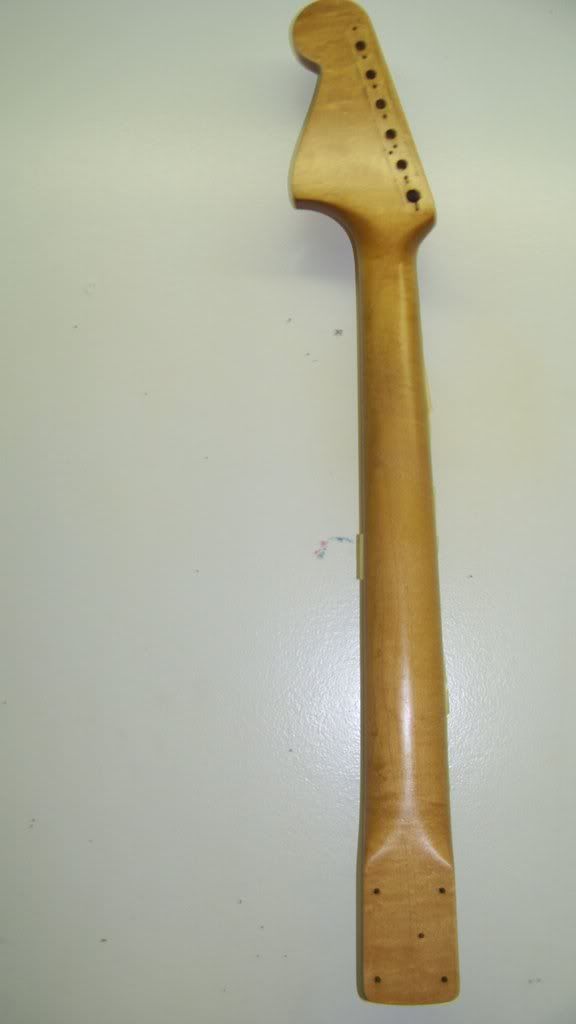
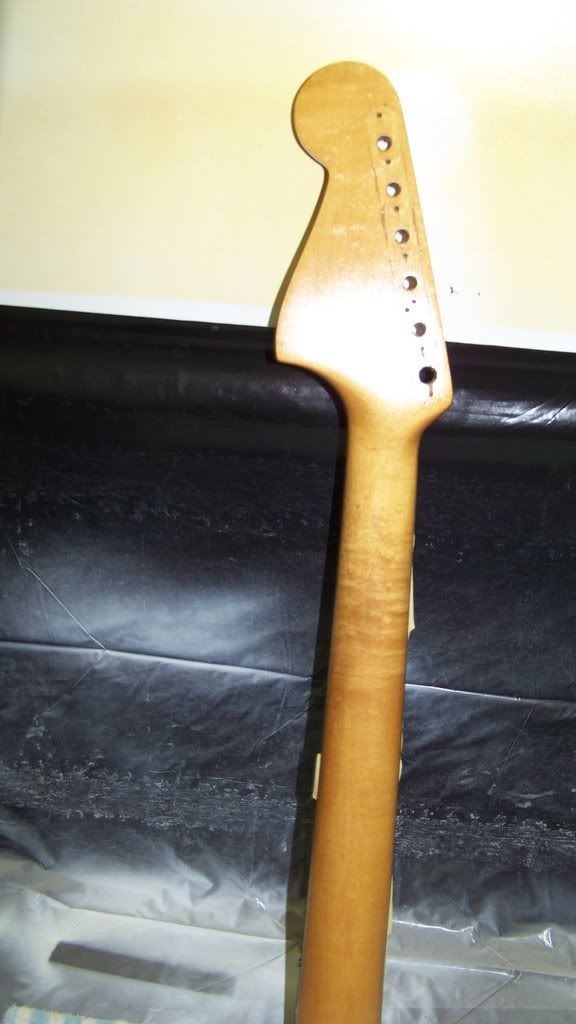
The next step in this process for me was to begun finishing the neck. Once I had removed all stripper residue, I rubbed down the neck with #2 steel wool and lacquer thinner.
**for anyone new to refinishing/finishing, grain filling is not necessary when working on maple, the grain is tight enough as it is**
Now I needed to sand the neck. but I didn't want to go too rough and end up reshaping this beautiful neck. so i leaned on the side of caution and started out with a 500 grit sanding pad, working my way up to 2000. also, this particular neck had some very nice flame in it, and I wanted to bring that out, so I then applied an oil based natural stain on the bare wood, using a small sponge brush. after I let it sit for a few minutes, i rubbed off the excess with paper towels. again, if it gets messy on ya, you can remove extra stain with mineral spirits, if needed. this comes in handy if you are too lazy to use gloves
i wish i had pics of the guitar neck in this process, but my camera broke, and i had to get it sent in for repairs.
Cheers,
Aaron
Facebook.com/aarons.guitars
"Politicians are like diapers; they need to be changed often and for the same reason."
— Mark Twain
Aaron
Facebook.com/aarons.guitars
"Politicians are like diapers; they need to be changed often and for the same reason."
— Mark Twain
-
oipunkguy
- Master Contributor
- Posts: 2208
- Joined: Tue Jul 22, 2008 1:05 am
- Location: Winchester, Virginia
- Contact:
Re: Bringing an ORIGINAL 1964 Fender Mustang back to life
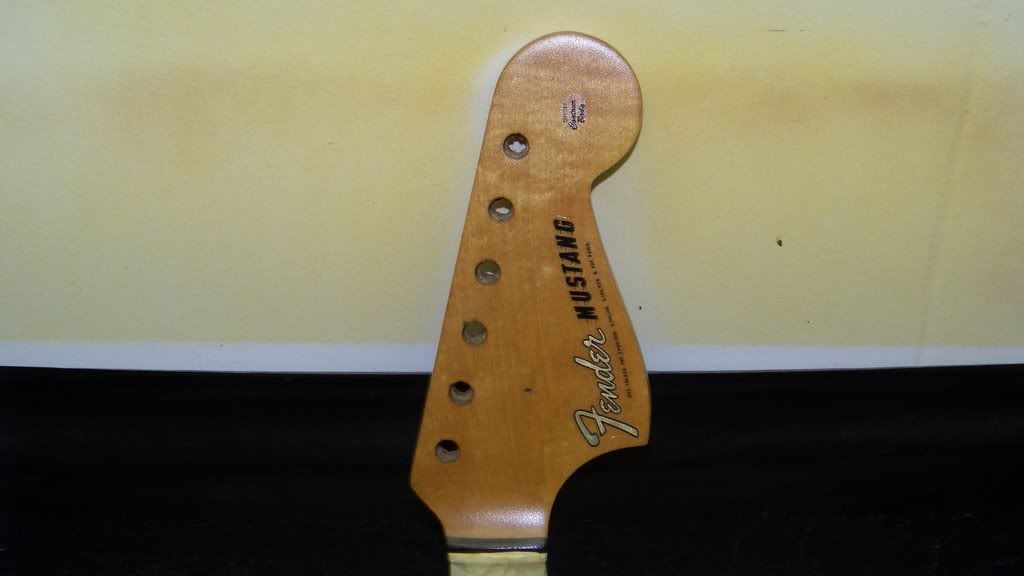
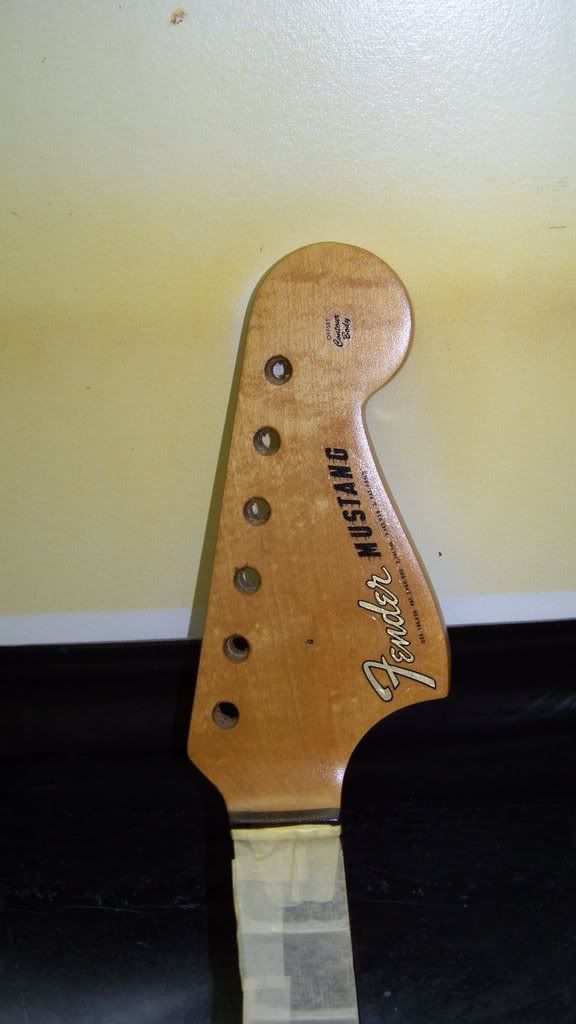
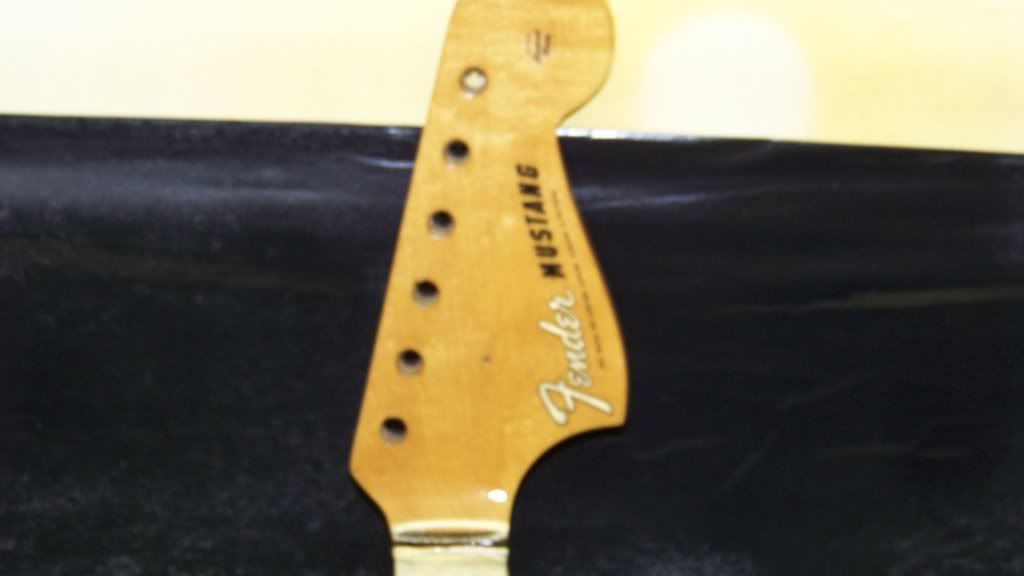
Once the stain dried, I then removed the mustang nut to clean it up. I did this simply by sprapping it carefully with a razor blade, followed by a light sanding with a 1000 grit buffing pad. once the nut was looking good, I glued it back on with a little super glue.
my next step was to tape off the fretboard and the top of the nut. but allowing lacquer to be sprayed on the side of the fretboard and the side of the nut, just like any other fender.
once I was happy with the tape job, I then sprayed a thin coat of clear on the guitar neck to "seal in" the stain. no sealer coat was necessary. Once the lacquer dried, I buffed down the headstock with 1000 grit to prepare to attach the decal. before starting i wipe the headstock down with naphtha to have a clean surface to work on.
this was the first time I ever attach a water slide decal, so I first practiced on a piece of scrape wood. the decal comes with the backing paper attached to it, and all you do it drop it in a shallow container filled with luke warm water. once the decal starts to curl up, it's ready. you just carefully bring the decal to the headstock, and using your fingers, slowly rub the decal off the backing paper. I use a picture of other mustangs as my guide, to place the decal in the correct spot. you have a few minutes to work with the decal while it's still wet, just make sure it's completely flat with no wrinkles or air pockets before you let it set up. once I got it set I then very very gently tap the decal with a paper towel to dry it, making sure I didn't get the decal to move on me.
decal work really isn't that hard, as long as you have patience, and a steady hand. i let the decal dry over night before working on it any farther. these pics are from the next day.
Cheers,
Aaron
Facebook.com/aarons.guitars
"Politicians are like diapers; they need to be changed often and for the same reason."
— Mark Twain
Aaron
Facebook.com/aarons.guitars
"Politicians are like diapers; they need to be changed often and for the same reason."
— Mark Twain
-
oipunkguy
- Master Contributor
- Posts: 2208
- Joined: Tue Jul 22, 2008 1:05 am
- Location: Winchester, Virginia
- Contact:
Re: Bringing an ORIGINAL 1964 Fender Mustang back to life
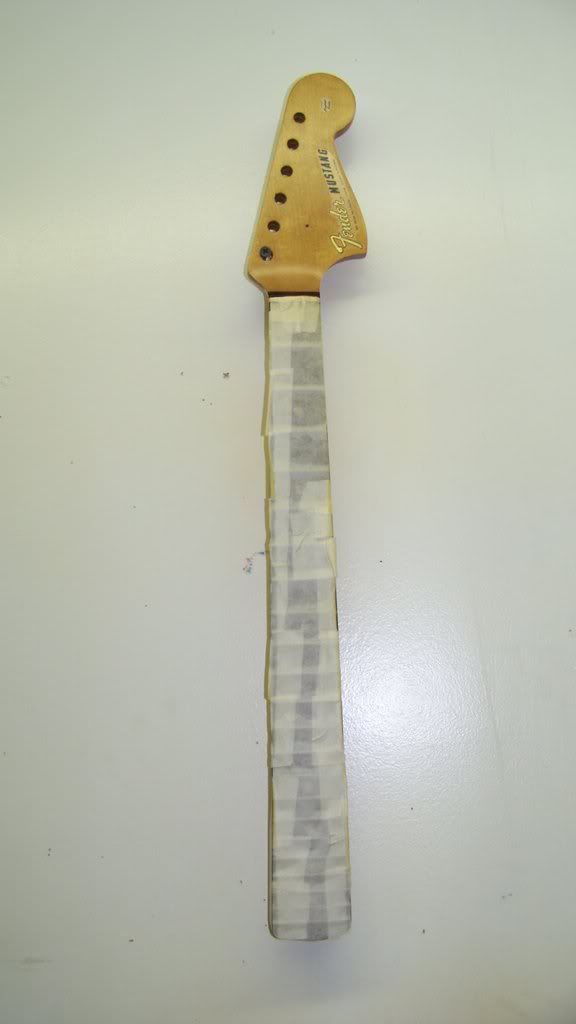
Once I had this done, I then sprayed a very very very dry thin coat of clear over the decal. you must approach this with extreme care. if you spray too wet of a coat, the decal will wrinkle up on ya, which is why fender always put there decals above the finish in the old days.
once the first coat dried, I sprayed it again, and repeated this process four more times.
Now I was ready to spray my color coats on the neck, to give it that amber shading that looks so cool.
for this I used Guitar ReRanch colors 'fender neck amber' and the 'tinted clear coat' I sprayed the neck amber on in very dry coats to get it even, and to also make sure I didn't go too dark. I then sprayed the neck with the tinted clear coat, again spraying it very thin and very dry. once I was happy with the color tone, I then sprayed the neck again, but with regular gloss clear a few times and allowed it to set up and dry.
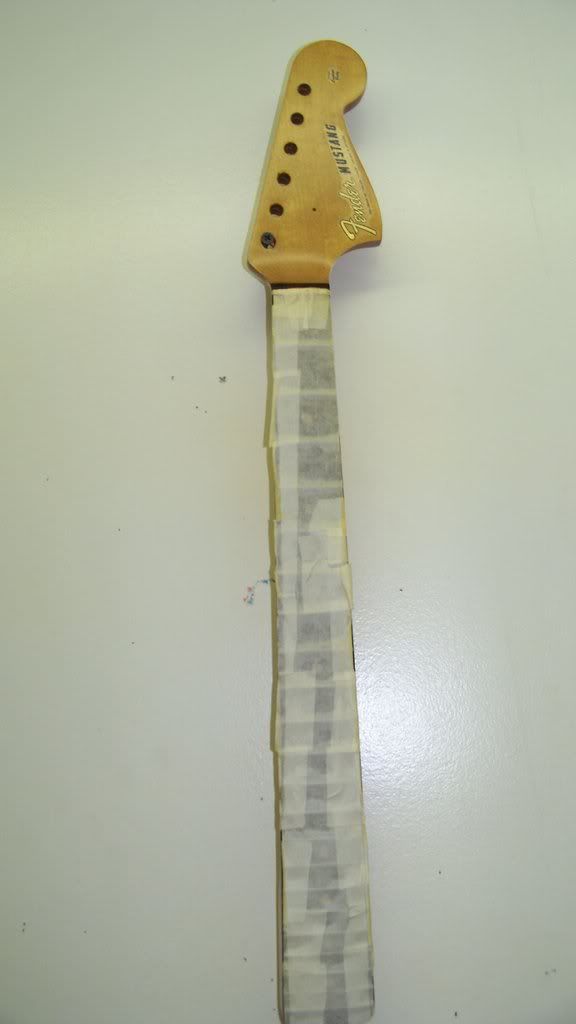
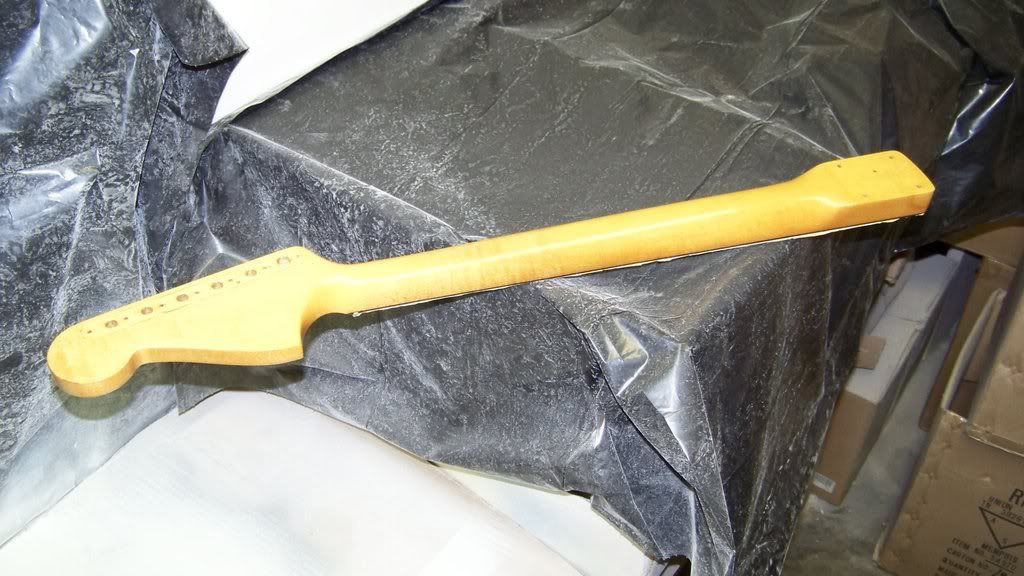
Cheers,
Aaron
Facebook.com/aarons.guitars
"Politicians are like diapers; they need to be changed often and for the same reason."
— Mark Twain
Aaron
Facebook.com/aarons.guitars
"Politicians are like diapers; they need to be changed often and for the same reason."
— Mark Twain
-
oipunkguy
- Master Contributor
- Posts: 2208
- Joined: Tue Jul 22, 2008 1:05 am
- Location: Winchester, Virginia
- Contact:
Re: Bringing an ORIGINAL 1964 Fender Mustang back to life
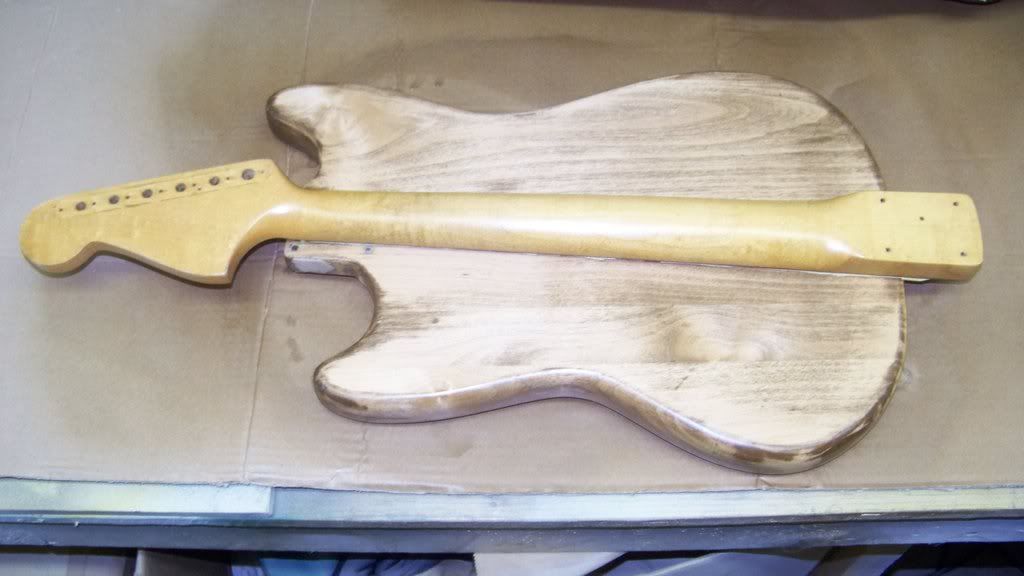
Now it was time to spray the primer coat on the mustang body. But first I had to remove all the brass shielding. the shielding came out fairly easy, it was just held down with some small finishing nails. I then placed the shielding in a container, not to lose any parts so I could clean them up later. Also the bridge studs I left in the guitar, they worked just fine, and there was no sense to pull them out, so I just taped them off while I sprayed the primer coat.
the primer coat comes out a starch white color and feels like chalk on the guitar when dried. I used guitar reranch primer. I sprayed the guitar a few times on each side, making sure I got an even coat through out, then I lightly sanded it and started again. here's what it look like after I was done.
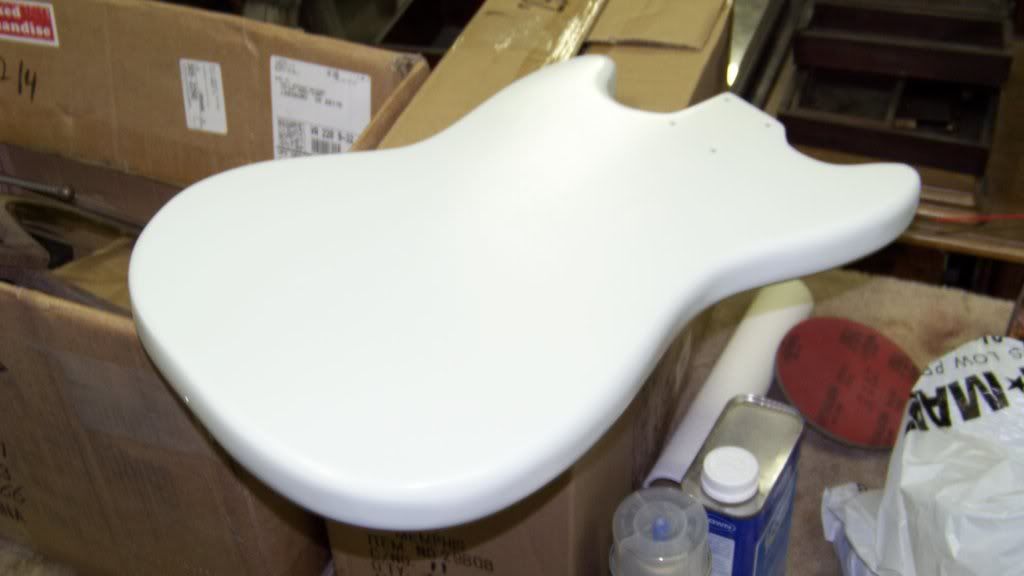
the primer coat comes out a starch white color and feels like chalk on the guitar when dried. I used guitar reranch primer. I sprayed the guitar a few times on each side, making sure I got an even coat through out, then I lightly sanded it and started again. here's what it look like after I was done.
Cheers,
Aaron
Facebook.com/aarons.guitars
"Politicians are like diapers; they need to be changed often and for the same reason."
— Mark Twain
Aaron
Facebook.com/aarons.guitars
"Politicians are like diapers; they need to be changed often and for the same reason."
— Mark Twain
Return to “Other Instruments, Equipment, Accessories & Projects”
Who is online
Users browsing this forum: No registered users and 162 guests